
|
|
|
| Operating Systems Development Series | |
|
This series is intended to demonstrate and teach operating system development from the ground up. IntroductionWelcome!We have went over alot in the previus tutorial. We took a look at what exactally happens when you press the power button, and how the BIOS boots. We also looked at the BIOS Interrupt (INT) 0x19, which searches for a boot signiture (0xAA55), and, if found, loads and executes our bootloader at 0x7C00. We also developed a simple bootloader, and got some experience with the entire build process. In this tutorial, we will expand on our bootloader. We will cover:
Note: From here on out, our bootloader has full control of the entire system. What this means, is simply that everything relys on us writing the code. Everything now is up to us! In short: There will be alot more code comming up. From here on out, things are going to get more complex. To insure the structure of this series stays solid, I will have a downloadable demo with each and upcomming tutorials. This will aid in understanding the concepts. Dont worry--I will still be explaining everything in detail here. Ready? Processor ModesWell, well...Where have we heard this term before? Lets see... In every single tutorial!And yet, we have not really talked much about it. Understanding the different processor modes will be very important to us. Why is this? In the previous 2 tutorials, we talked about how and why the x86 family boots up in a 16 bit envirement. We want to develope a 32 bit operating system (OS), so we will need to switch the processor from its 16 bit mode into a 32 bit mode. There are more then two modes. Lets go over each one, shall we? Real ModeAs you know, the x86 processor boots into a 16 bit envirement. What is this mode? (Hint: Its not Real Mode) ... Okay, it is :)What is so real abut real mode, anyway? Real Mode...
Lets take a closer look, shall we? Segment:Offset Memory Mode - HistoryLets go Back In Time(tm) again, and look at Tutorial 2. The concept of Memory and use of Operating Systems dated back since the 1950s. These computers were not personal computers, but instead large mainframe computers.Remember that, back then, all computers had very large and bulky hardware devices. Through time (Looking back at Tutorial 2), you can see not only advances in Operating Systems, but computers as well. As computer poplurity gained, so did its demand. When computers were 8 bit, many wanted 16. When the 16 bit era came, Microsoft was already thinking 32 bit. As soon as the 32 bit area came, 64 bit was already mainstream. Okay, the last one isnt true :) but, 128 bit is on its way. The primary problem is the computer industry moves to fast. When Intel was designing the 8086 Processor, the processor used 16 bit registers, and could only access up to 64 KB of memory. The problem, however, was that alot of software required more memory then this. The 8086 was being designed the same time the 8088 was. The 8088, however, was going to be Intels "next generation" processor, except it was taking longer then expected. To challenge the other companies, Intel quicky wanted to develope and release a processor, the 8086, to hold off until the 8088 was released. The problem here is that, software demanded more memory then 64 KB, and Intels processor, the 8086, was to challenge their competitors who is already building 16 bit processors, until the 8088 was released. Intel needed a stragety. The designers of the 8086 proposed a solution. This solution will allow the 8086 to stay 16 bit, while being able to access up to 1 MB of memory. They aggreed, and Intel approved. The segment:offset memory scheme was born. To understad the segment:offset scheme, lets break it down and look at segments and offsets first. SegmentsA Segment is simply a part of a whole. In our case, A segment is a section of memory. Yep--Thats basically all it is.Imagine dividing memory into sections. These sections represent segments. The x86 Family of processors uses 4 primary registes that store the beginning location of a segment. Its like a base address--It provides the start of a segment. Normally, a segment may be 64 KB in size, and are freely movable. Remember that segments simply epresent a section in memory. In this case, if the segment base address is 0, then this represents the segment between byte 0 and 64 KB. The registers are CS, DS, ES, and SS. These registers store the base address for the segments. We will take a closer look at them after we look at addressing with this mode. OffsetsAn offset is a number that is added to a base number. For example, if the base number is 3:
Offset = base number (3) + the offset number Okay, so how does this relate to us? Well, in segment:offset addressing, we add the Base Address (Remember that a segment represents a base address) with the offset address! Pretty simple, huh? Now, lets put it all together. Segment:Offset AddressingIn Segment:Offset Addressing, we simply add the offset address with the segment address. However, in the previous section, I mentioned that each segment address in Real Mode is 16 bits in size. This means we also have to multiply our segment by 16(decimal), and then we add the offset. So, heres our current formula:Thats all there is to it :)Absolute (Exact) Memory Address = (Segment Address * 16(decimal)) + Offset Segment:Offset ConventionsSegment and offset addresses are useually seperated by a colen (:). They are useually of the form Segment : Offset. For example:We can convert the above to the absolute address 0x7C00 by using our formula:07C0:0000 < 07C0 is the segment, and 0 is the offset Segment:Offset ProblemsSegment:Offset is quite unique. By changing the segment and offset values, you can find different segment:offset pairs will yeld the same absolute address. Why? Because they both refer to the same memory location!For example, all of the below addresses refer to our bootloader at 0x7C00: These are only a few. Technically, there is exactally 4,096 different combinations of segment:offset that can refer to the same byte in memory -- This is for each byte in memory!0007:7B90 0008:7B80 0009:7B70 000A:7B60 000B:7B50 000C:7B40 0047:7790 0048:7780 0049:7770 004A:7760 004B:7750 004C:7740 0077:7490 0078:7480 0079:7470 007A:7460 007B:7450 007C:7440 01FF:5C10 0200:5C00 0201:5BF0 0202:5BE0 0203:5BD0 0204:5BC0 07BB:0050 07BC:0040 07BD:0030 07BE:0020 07BF:0010 07C0:0000 What if we have two segment addresses that are within 64 KB? Remember that the size of a segment (and offset) are 16 bits. And the segment addresses refer only to the base of a segment. This is what an Overlapped Segment is: 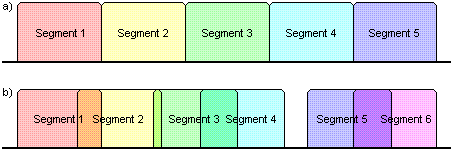 Imagine layers ontop of layers that lay over other segments. This could cause problems. This means, in Real Mode, you can access every byte in memory, over 4,000 different ways, being able to overlap segments that could potentally currupt that area of memory without you knowing. This is what is ment by Real Mode not having any Memory Protection. The registers the x86 use for segment refrencing are as followes:
Wow, Real Mode has alot of problems. What will protect little old us from it? Protected ModeProtected Mode (PMode) is a term you heard alot, and will here alot more. PMode allows Memory Protection through the use of a Descriptor Tables that describe your memory layout.PMode is a 32 bit processor modes, so it also allows you to use 32 bit registers, and access up to 4 GB of RAM. A huge improvment over Real Mode. We will be using PMode. And yes, before you ask, Windows is a PMode OS. :) PMode is a bit tricky to set up and to fully understand how it works. We will discuss more about PMode later. Unreal ModeIt is possible to switch from processor modes whenever you want. The term "Unreal Mode" is a pun that represents Real Mode with the address space (4 GB limit) of PMode.To enable Unreal Mode, simply switch the processor from Real Mode into PMode, and back again after loading a new Descriptor. Descriptor Tables can be quite confusing. I will talk about them in detail when we talk more about Protected Mode (PMode). Virtual 8086 ModeVirtual 8086 Mode (v86 Mode) is a Mode that reresents Protected Mode with a 16 bit Real Mode emulated envirement.This might seem kind of strange, dont you think? v86 can be usefull, however. All BIOS interrupts are *only* avilable in real mode! v86 Mode provides a way of executing BIOS interrupts from within PMode. More on this later. Switching processor modesWe wont cover the code to switch processor modes just yet. Instead, I want to take a step back and explain some important concepts.The only two built in actual modes are Real Mode and Potected Mode. In other words, the other modes, Unreal Mode and v86 Mode, are built from these two modes. Remember that Unreal Mode is in Real Mode, but uses the Protected Mode (PMode) Addressing system. And, Virtual 8086 Mode is in PMode, but uses Real Mode to execute 16 bit code. As you can see, both v86 and Unreal mode are simply based off of Real Mode and Protected Modes. Because of this, it might be hard to understand how these modes work without an understanding of PMode. We will take a closer look at PMode, Unreal Mode, and v86 Mode soon, so dont worry :) There is some important things to remember about PMode however:
Expanding the bootloaderWow, we went over alot so far, didnt we? We went over basic theory of Protected Mode, Unreal Mode, and v86 Mode. We covered Real Mode in depth though. Why? Because, remember that the computer boots in a 16 bit envirement for backward compatibility with DOS. This 16 bit envirement is Real Mode.So, yes-When our bootloader is executed, we are in Real Mode. Wait! This means we can use BIOS Interrupts, right? Yep :) Ths includes VGA Video interrupts, and any other interrupt mapped directly from hardware :) Usefull Routines and BIOS InterruptsOEM Parameter BlockThe OEM Parameter Block stores the Windows MBR and Boot Record information. Its primary purpose is to describe the filesystem on the disk. We will not describe this table until we look at filesystems. However, we can go no further without it.This will also fix the "Not formatted" message from Windows. For now, think of this table as a simple neccessity. I will explain it in detail later when we talk about File Systems, and loading Files off disk. Here is the bootloader with the table:
Printing Text - Interrupt 0x10 Function 0x0EYou an use INT 0x10 for video interrupts. Remember, however, that only basic interrupts will work. INT 0x10 - VIDEO TELETYPE OUTPUT
AH = 0x0E This will print the character 'A' on the screen. Printing Strings - Interrupt 0x10 Function 0x0EUsing the same interrupt, we can easily print out a 0 terminated string:
Getting amount of RAMThis is too easy:
INT 0x12 - BIOS GET MEMORY SIZE Heres an example: Wow... That was hard, wasnt it? :) Actually, it can be very hard to do in Protected Mode (PMode) as you will not have any interrupts available. Note: The amount of memory actually returned from the BIOS might not be accurate! We will look at some other methods later. Demo
ConclusionGive yourself a pat on the back for making this far. :) This tutorial was a nasty one. I had to find a very good way of explaining segment:offset addressing and the processor modes without going into to much depth. I think I did well :) We talked about the different processor modes--Real Mode, Protected Mode, Unreal Mode, and v86. We looked at Real Mode in depth because we will be in that mode when developing the bootloader. We also went over segent:offset addressing. This might be a refresher course for some of our DOS programmers out there. We also looked at some BIOS interrupts, and ended with a complete example. In the next tutorial, we are going to decypher that ugly OEM Parameter Block that we added. We are also going to take a look at basic File System theory, and loading sectors off disk. Until next time,
~Mike |

